Registering is the easy part. What happens in the first week after that is where most new tools either land in a routine or quietly fade out of a browser tab. This article is a six-day rhythm for Minuvox: five workdays with one clear goal each, plus a short weekend check-in.
This is not the setup manual. How to Set Up Online Booking for Your Salon already covers the field-by-field walkthrough for every page this article touches, and when a day below sends you to a specific screen, you click into the linked article for that screen. This one is about sequence and timing. The question it answers is “what should I do today and how will I know I am done”.
Before You Start: What “First Week” Actually Means
The expected starting state for this rhythm is that you have registered a Minuvox account, verified your email, and logged in at least once. If you have not done that yet, the registration itself takes about two minutes – article #1 above covers that – and you can come back here once you are looking at an empty dashboard.
The shape of the week is small. One day for a minimum-viable proof that Minuvox works for your business. Three days for real configuration. One day for a real booking and a real invoice. One weekend check-in to see the first week’s numbers. Total time across the week is somewhere between two and three hours, spread across six sessions of ten to sixty minutes each. None of the days depend on you being at a computer all day.
If your business is just you – a solo stylist, a freelance trainer, a one-person massage practice – Day 4 collapses to a two-minute check, and you can use the saved time to put more services on Day 3 or take more real bookings on Day 5. The notes on each day call out the solo path where it differs.
Day 1 – Prove It Works (20 minutes)
The goal for today: see Minuvox handle one booking from end to end, with nothing more configured than the absolute minimum. Proof, not polish.
Create one category (call it whatever your business calls the work: Hair, Nails, Massage, Training). Add one service to it with an honest duration and a price. Assign that service to yourself – this matters. When you register, Minuvox creates a staff record for you automatically, but that record has no services attached until you attach them, which is why brand-new owners sometimes see “no staff available” when they try to book. Take thirty seconds to fix that now. Then adjust the default business hours if 09:00 to 17:00 Monday to Friday does not match your real week, and create one test booking on your own calendar.
You are done for today when your calendar shows one appointment on it, colour-coded by the service you created. Click it. You should see the booking detail page. That is the whole proof.
What to skip today: your billing profile, your logo, your other staff members, your real clients, real invoices. All of those come later in the week. If you feel the urge to configure everything today, close the browser tab and go do something else. The minimum-viable proof is enough for Day 1.
If any step above felt fiddly, How to Set Up Online Booking for Your Salon is the field-by-field walkthrough for every page you will touch today.
Day 2 – Make Invoices Real (10 minutes)
The goal for today: any invoice you send out from this week on looks professional. Not a half-branded template with the wrong business name. Not a blank placeholder where a logo should go. A real invoice profile, locked in before you charge your first real client.
Open Billing Settings. Fill in your legal business name, your tax identifiers, your structured billing address, your payment instructions, and your logo. That is it.
You are done when the Invoice Header Preview at the bottom of Billing Settings shows your actual business identity, not an empty template.
If you are not yet worried about invoices because you have not taken a real booking yet, you can park Day 2 and come back to it on the morning your first real client is about to pay – but not after. An unbranded first invoice is a small, permanent embarrassment you only get one chance to avoid.
For the field-by-field walkthrough of Billing Settings (legal business name, tax IDs, logo upload rules, footer text, payment instructions, and an honest note on how Minuvox handles old logo files), Setting Up Your Company Profile, Logo, and Business Hours is the detail article. Skim it once so you know where every field lives, then fill the page in.
Day 3 – Build Your Real Service Catalogue (20-40 minutes)
The goal for today: your Services page matches your real menu, not the one test service from Day 1. Every service a client can book has a category, an honest duration, and a price.
Go through your real service list with a pen or a spreadsheet in front of you. For each service, create a category if you do not have one yet, then add the service with its real duration, its real price, and a colour. The duration matters more than it sounds. Minuvox uses the duration you type in to work out which time slots are occupied when somebody books that service, so an optimistic number – “a cut and blowdry in 25 minutes” – sets you up for overlapping bookings later. Type the honest number.
You are done when your Services page has every bookable thing your business offers on it. Run one test booking for a service that is NOT the one you created on Day 1. If the new service shows up in the booking form, you are fine.
What to skip today: perfect category hierarchies. Perfect pricing. A thoughtful description for every service. Get the rows in. You will refine the catalogue over the next month as you see which services book most and which need a rename. For the exact Add Service form walkthrough, look at Step 2 of How to Set Up Online Booking for Your Salon.
Day 4 – Bring in Your Team (15-60 minutes, or 2 minutes if solo)
The goal for today: every person your business books is in Minuvox, and the people who need their own login have one.
For each team member, decide first whether they need a login or just a calendar record. Most staff do not need to log in themselves – the owner-managed booking model is the Minuvox default, and keeping logins off for everyone who does not need them is the simpler path. A receptionist who takes bookings, a senior stylist who self-manages, or a business partner who needs to see the numbers are the usual yes cases. The rest can be scheduling-only records.
Then add each staff member with the right kind of record, assign them to the services they actually perform, and send an invitation link to anyone who needs one.
You are done when the Staff list shows every member of your team, each with the right Login Access state and the right action button next to their name – ✓ Active for the people whose invitations have been accepted, 📧 Invite for anyone still to onboard.
Solo path: if your business is just you, Day 4 is a two-minute check that your own staff record still has services assigned (from Day 1, when you fixed the auto-created empty assignment). Use the saved time to finish Day 3 or to take more real bookings on Day 5.
For the full walkthrough of staff accounts – the login toggle, the invitation flow, what the staff member sees when they click the link, the owner-vs-everyone-else permission model, and how to turn login off again without deleting a staff record – How to Set Up Staff Accounts and Manage Permissions is the detail article. For weekly schedules, time off, and per-staff service assignments, Staff Scheduling for Small Service Businesses picks up from where accounts leave off.
Day 5 – Run a Real Day (1 hour across the day)
The goal for today: Minuvox has real data from real clients at the end of today, not test data. The rhythm shifts from “setting up” to “running”.
Take at least one real booking from a real client. Because Minuvox is staff-initiated booking (no public client-facing portal yet), the booking starts with you – a phone call, a WhatsApp message, a walk-in – and ends with you typing it into the calendar. As the appointment moves through the day, move its status with it: Scheduled when the booking is created, Confirmed when the client acknowledges, Arrived when they walk in, Completed when the work is done. Issue at least one real invoice against the booking and mark it Paid when the client pays.
You are done when your Bookings page has at least one non-test booking on it, your Invoices page has at least one non-test invoice, and both are tied to a real client in your Clients list. You have also seen at least one booking walk through its status lifecycle, so you know what that flow feels like in your own hands.
What to expect: the first few real bookings feel a bit mechanical. That wears off within the first week. By the end of Day 5 you have enough rhythm to stop thinking about the software and start thinking about your clients again.
The full invoice lifecycle – Draft, Issued, Paid, Void, and the workflow for correcting a mistake on an invoice already sent out – lives in How to Create Professional Invoices for a Service Business. The booking-status reference is in the “Managing Bookings After They Are Created” section of How to Set Up Online Booking for Your Salon.
Day 6-7 – The First Weekend Check-In (15 minutes)
The goal for today: open the Dashboard and see the shape of your first week. Pick one thing to adjust next week. That is it.
Open the Dashboard and set the time period to “This week”. Look at the revenue number, the booking count, the no-show rate, the most popular services panel, and the staff performance panel. Spend five minutes reading what is in front of you.
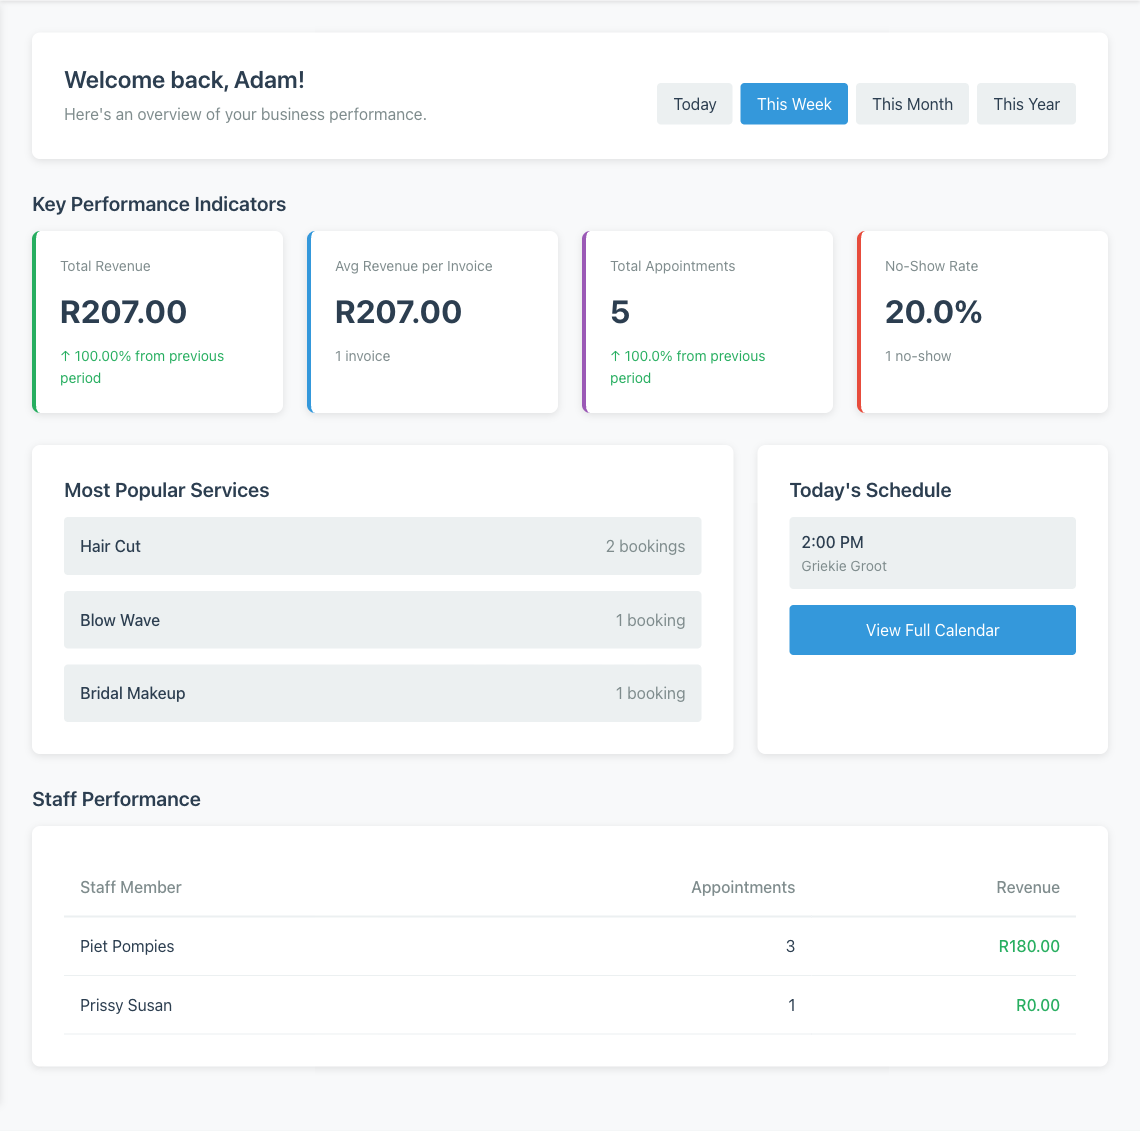
Here is the honest part, because most vendor getting-started content skips it. After one week with a handful of bookings, every percentage on this page is noisy. A no-show rate of 33 percent off three bookings means one person did not show up, not that your business has a retention crisis. Most popular services with two bookings each is not a trend. Staff performance with five bookings spread across two people is not a verdict on anyone. None of that is a Minuvox problem – small sample sizes are noisy everywhere, and the dashboard is showing you the honest arithmetic, not a softened version of it.
The goal of the weekend check-in is not to draw conclusions from the numbers. It is to see the shape of the dashboard so you know where to look when the sample gets bigger. Learn which panel is on the left and which is on the right. Notice which numbers update instantly when you click into a booking. Read the labels. By week four, when the same panels have forty bookings behind them instead of four, you will know exactly where to look.
You are done when you can answer three questions without guessing: “what was last week’s revenue”, “how many bookings did I log”, “what do I want to change this week”. If you cannot answer any one of those, open the relevant panel on the Dashboard and scroll it. The number is there; you just have not looked yet.
For what each panel actually means once you have more than one week of data behind it, How to Read Your Salon Dashboard and Spot Business Trends is the deeper read. Save it for week four.
What Week 2 Looks Like (and Why This Article Ends Here)
From week 2 onwards, the rhythm of Minuvox is not a setup rhythm any more. Daily: create bookings, move them through their statuses, issue invoices, mark them paid. Weekly: check the Dashboard and look for the first real signal. Monthly: review what the data is telling you and decide what to adjust.
This article ends at the end of week 1 on purpose, because the onboarding problem is a week-one problem. From week 2, you are running Minuvox, not learning it – and that is the whole point of the six days above.
You Do Not Have to Do It All in One Sitting
If you remember one thing from this article, make it this: the goal of the first week is not to configure every option. It is to get from a blank dashboard to real bookings and a real invoice, and then to notice what the dashboard is telling you. The detail articles linked under each day above are your reference manual; this one is your rhythm. Browse the full feature set whenever something catches your eye that has not come up yet.
About the author: Adam Claassens is the founder and developer of Minuvox. He designed the onboarding flow walked through in this article and wrote the dashboard analytics code that underpins the weekend check-in, which is why the rhythm here matches how the product actually behaves in week one. Minuvox exists to make professional booking tools accessible to small service businesses that cannot afford expensive monthly subscriptions.
This article was drafted with AI assistance and reviewed, fact-checked, and edited by the Minuvox team.