When it is just you and a paper diary, staff scheduling is not something you think about. But the moment you add a second person to your team – or a third, or a fourth – you need a system that knows who works when, who does what, and who is off next Tuesday.
Minuvox handles this through staff profiles. Each person who performs services has a profile with their working hours, service assignments, and availability. The calendar uses this information to show only available staff when you create a booking, and to block time slots where someone is not working or on leave.
This guide covers setting up your team, configuring individual schedules, handling time off, and using the calendar to stay on top of everyone’s availability. If you have not set up your account yet, start with How to Set Up Online Booking for Your Salon – that guide walks through creating your first staff member.
What Staff Management Looks Like in Minuvox
Every staff member in Minuvox falls into one of two categories:
- Staff without login access – the most common type. You, the salon owner, manage their schedule and bookings for them. They do not need an email address or password. This is the right choice for most salon employees.
- Staff with login access – for people who need to log in and manage bookings themselves, like a receptionist or senior stylist. Staff with login can view and manage the calendar, clients, and bookings, but only the owner can access billing settings, company deletion, and the discount system.
Each staff member has a detail page with four tabs:
- Information – name, contact details, service assignments, status
- Schedule – individual weekly working hours and lunch breaks
- Time Off – vacation, sick leave, blockout periods
- Activity – recent actions related to this staff member
You do not need to fill in everything on day one. Start with the basics – name and service assignments – and add schedules and time off as your business needs them.
Step 1: Add Your Team
If you followed the setup guide, you already have at least one staff profile. Here is the full picture of what each profile includes:
- Click Staff in the left sidebar
- Click + Add Staff Member
- Fill in:
- First Name and Last Name
- Email and Phone – both optional unless you plan to enable login for this person
- Service Assignments – which services they can perform. Three options: tick Can Perform All Services for generalists, assign entire Categories (a stylist assigned to “Hair” can perform every service in that category), or pick individual Specific Services. See how categories and assignments work for detail.
- Can Login – leave unchecked for most staff
- Allow Double-Booking – for roles that share a time slot, like a trainee position or a consultation room
- Enforce Lunch Schedule – checked by default; blocks bookings during the lunch break times you set in their weekly schedule
- Notes – internal notes visible only to staff with login access
- Click Create Staff Member
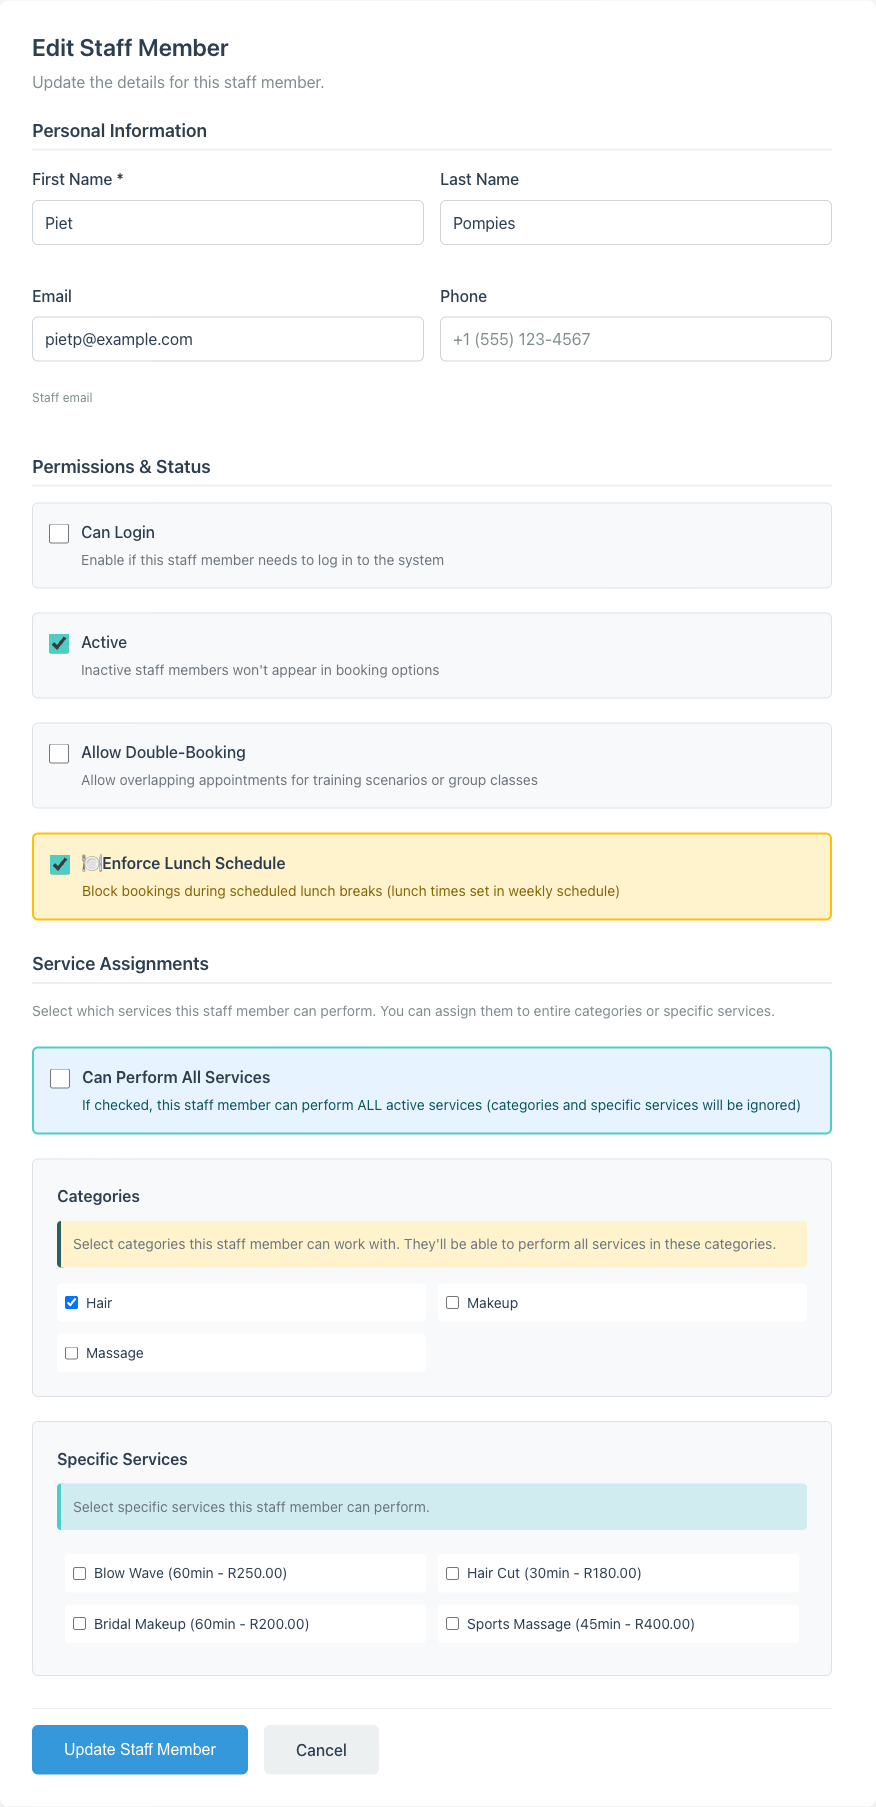
The service assignment step is not optional. A staff member with no services assigned will not appear as available when you create a booking. If you see “no staff available” in the booking form, check the staff member’s service assignments first – this is the most common cause.
Step 2: Set Individual Working Hours
Company-wide business hours (set in Preferences) define when your business is open. Staff schedules define when each person is available within those hours.
To set a staff member’s weekly schedule:
- Click Staff in the sidebar
- Click View next to the staff member
- Click the Schedule tab
- Click Edit Schedule
- For each day of the week:
- Tick the day to mark it as a working day
- Set the start time and end time
- Optionally set lunch start and lunch end times
- Leave days unticked where the person does not work
- Save the schedule
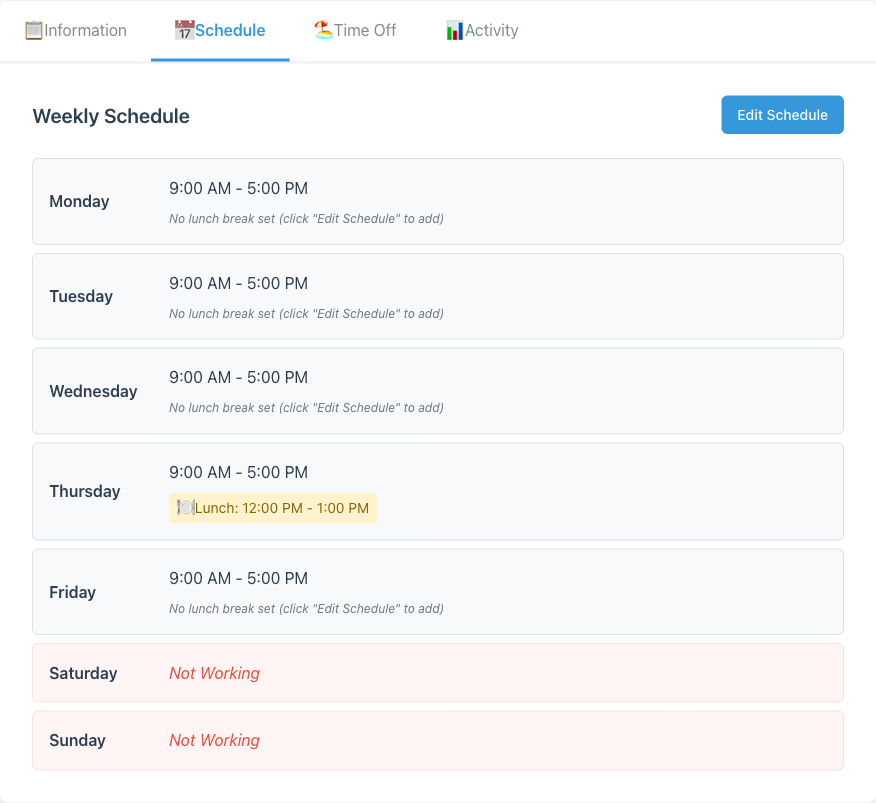
If a stylist works Monday to Friday, 9am to 5pm with a 1-hour lunch at 12pm, set that here. If a part-timer only works Wednesdays and Saturdays, tick just those two days.
The calendar uses these schedules directly. When you try to book a service with a particular staff member, Minuvox checks their schedule for that day and time. If they are not working, the slot will not be available.
What if you do not set a schedule? Staff without an individual schedule default to the company-wide business hours. Setting an individual schedule overrides the company hours for that person.
Step 3: Handle Time Off and Blockouts
People get sick, take holidays, and have appointments of their own. Minuvox tracks all of this through the Time Off tab on each staff member’s detail page.
- Click View on the staff member
- Click the Time Off tab
- Click + Add Time Off
- Choose the type:
- Vacation – planned leave
- Sick Leave – unplanned absence
- Blockout Period – a regular commitment that blocks part of the schedule (school pickup, dentist appointment, a standing meeting)
- Other – anything that does not fit the above
- Set the start date and end date
- For partial-day absences, set a start time and end time – for example, a dentist appointment from 2pm to 4pm on a Thursday
- Add an optional reason and notes
- Save
Time off appears on the calendar as a blocked period. Minuvox will not allow bookings for that staff member during their time off.
Recurring Blockouts
Some commitments repeat on a regular schedule. Instead of creating a separate time-off entry for each occurrence, you can set a blockout to repeat:
- Weekly – every week on the same day(s)
- Bi-weekly – every two weeks
- Monthly – once a month
Recurring blockouts are useful for staff who have a standing commitment – a part-timer who is unavailable every Friday afternoon, or a stylist who leaves early on alternate Wednesdays for a class. You can set an end date or leave it open-ended.
Step 4: See Your Team on the Calendar
The calendar is where schedules, time off, and bookings come together.
Open the Calendar page and you will see everyone’s appointments for the day. Use the Staff filter at the top to select which staff members are visible – you can view one person at a time or several side by side.
Below the main calendar, the Staff Upcoming Appointments section shows each staff member’s schedule for the next 7 days. This is a quick way to see who has a busy week ahead and who has gaps.
When you create a booking, Minuvox checks three things before showing a staff member as available:
- Are they assigned to the selected service (or its category)?
- Are they working at the requested day and time (per their schedule)?
- Are they free from time off or blockouts at that time?
If any of those checks fail, the staff member will not appear in the booking form’s staff dropdown. This prevents double-bookings and scheduling conflicts without you needing to check manually.
Inviting Staff to Log In
Most staff do not need their own login. But if someone does – a receptionist who takes bookings, or a senior stylist who manages their own schedule – here is how to set it up:
- Create the staff member (or edit an existing one) and tick Can Login
- Add their email address (required for login-capable staff)
- Save the profile
- On the Staff list, click the Invite button next to their name
- Minuvox generates an invitation link. Send it to the staff member.
- The staff member clicks the link, sets their password, and can now log in
Staff with login access can view and manage the calendar, staff list, services, clients, invoices, and bookings. They cannot access billing settings, company deletion, or the discount system – those are owner-only.
Tips for Managing a Growing Team
Use category assignments for large teams. If you have 8 stylists who all do hair services, assign them to the “Hair” category instead of ticking each service individually. When you add a new hair service, all 8 stylists inherit it automatically.
Deactivate, do not delete. When a staff member leaves, deactivate their profile rather than deleting it. Inactive staff stop appearing in booking options, but their past bookings and performance data remain intact. Only delete a profile if it was created by mistake.
Use the CSV import for large teams. If you are setting up 10 or more staff members, go to Import in the sidebar and upload a CSV file. Required columns are first_name and last_name. Optional columns include email, phone, can_login, is_active, can_perform_all_services, allow_multiple_bookings, and color.
Keep notes on each profile. The notes field is visible only to staff with login access. Use it for scheduling preferences, special skills, or anything you need to remember about that person.
Check the Activity tab. The Activity tab on each staff member’s detail page shows recent actions – bookings created, status changes, profile updates. If you have multiple people with login access, this is how you see who did what.
About the author: Adam Claassens is the founder and developer of Minuvox. He built the platform to make professional booking tools accessible to small service businesses that cannot afford expensive monthly subscriptions.
This article was drafted with AI assistance and reviewed, fact-checked, and edited by the Minuvox team.