Most staff members in Minuvox do not need their own login. The owner handles the bookings, and staff members exist as records on the calendar so the business can schedule them. That is the simplest way to run a small salon, and it is the default Minuvox is built around.
But some team members do need to sign in and do their own work: a receptionist who takes bookings, a senior stylist who manages their own client list, a business partner who needs to see the numbers. For those people, you need a different kind of staff record – an account with login capability.
This guide walks through creating that second kind of staff record, sending the invitation link, and the permission boundaries Minuvox enforces between the owner and everyone else. Working hours, time off, and service assignments are a separate topic and are covered in a companion guide on staff scheduling, linked at the end.
Two Kinds of Staff in Minuvox
Every staff member in Minuvox is one of two kinds:
Staff without login is the default. They exist as people the calendar can book – a stylist with a name, a colour, and a set of services they can perform. They do not need an email address and cannot sign in. You, the owner, manage their bookings on their behalf.
Staff with login is the exception. They have their own username and password, and can sign in to see the calendar, manage bookings, look at client details, and do most of the day-to-day work the owner can do.
Switching a staff member from “no login” to “with login” creates a user account for them in the background. Switching back disconnects that account rather than deleting the staff member. Both operations are non-destructive – you can toggle login on and off without losing any history, bookings, or audit entries.
Turning On Login for a Staff Member
The login toggle lives on the staff edit form. To enable it:
- Click Staff in the left sidebar
- Click Edit next to the staff member you want to give a login to (or create a new staff member with + Add Staff Member)
- Fill in an Email address – this is required once you enable login, and the form will refuse to save without one
- Tick Can Login
- Save
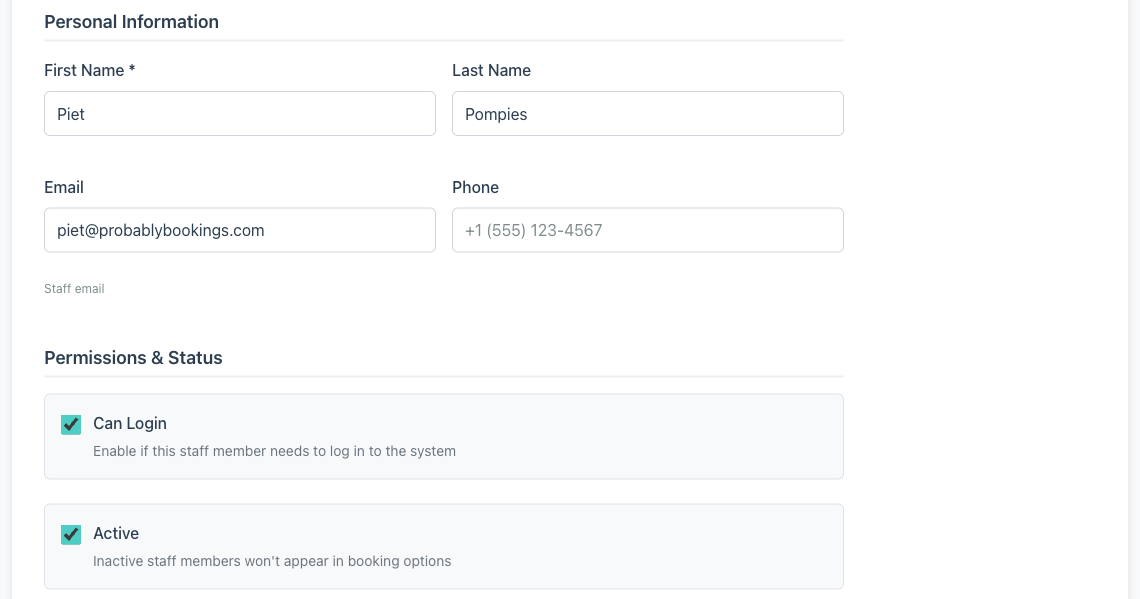
Minuvox auto-generates a username for the new account: first initial plus lastname, lowercased, with a number suffix if that username already belongs to another user. “Adam Claassens” becomes aclaassens; “John O’Brien” becomes jobrien. Staff sign in with this username, not with their email address, so you will need to share it with them.
The new account has no password yet. Minuvox does not pick one for the staff member; they set their own the first time they use the invitation link. Until then, the account exists but cannot be used to sign in. Generating and sending that link is the next step.
Sending the Invitation Link
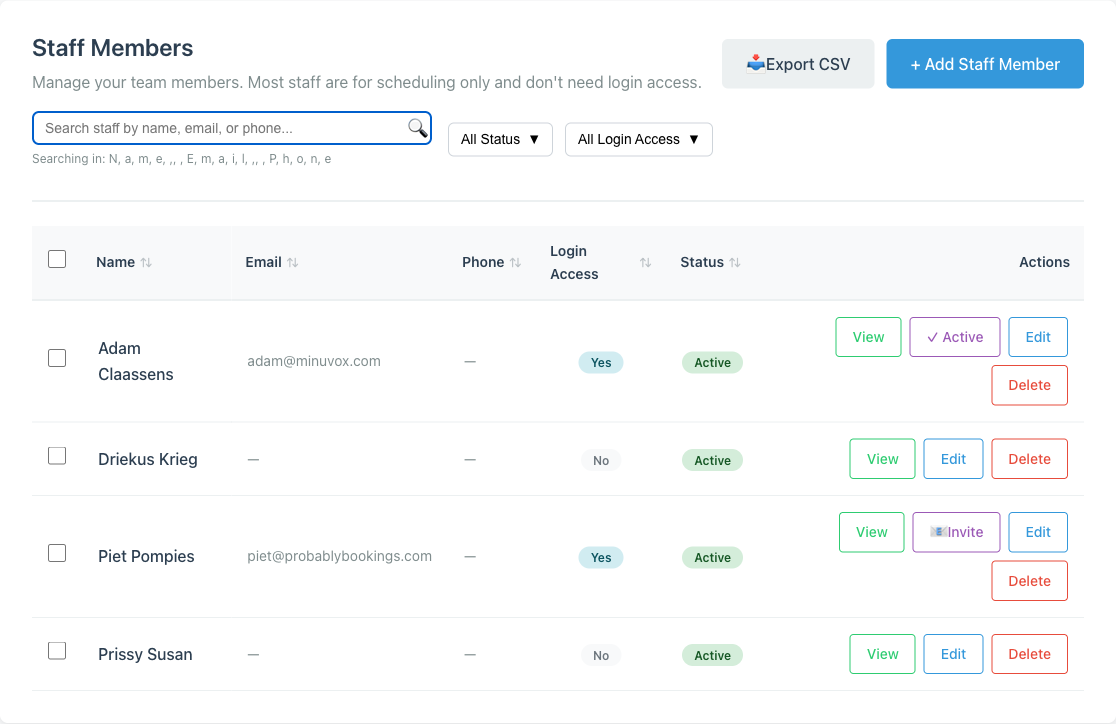
Go back to the staff list. Next to the staff member you just updated, you should see a new purple button: 📧 Invite. It only appears for staff members who have Can Login enabled and a backing user account, which is why it was not there before.
Click it. The invitation page shows two things you need to share: the auto-generated username, and the invitation link – a long URL with a signed token tied to this specific account. Both have copy-to-clipboard buttons.
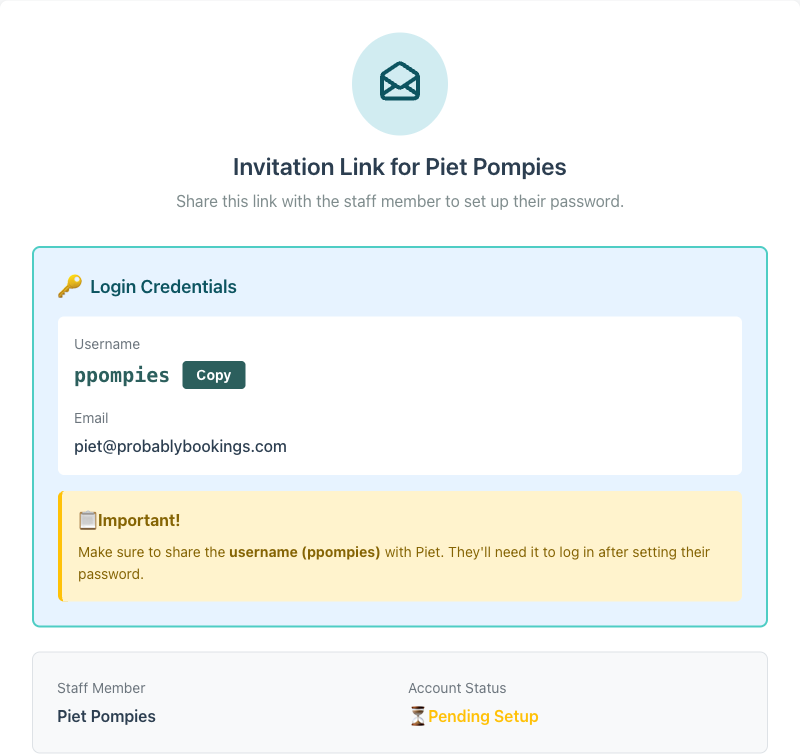
Send both to the staff member, by email, WhatsApp, SMS, or however your business normally reaches your team. Minuvox does not send the invitation email for you. This is deliberate – Minuvox does not run an outbound mail pipeline for staff onboarding – and it means the invitation goes exactly where you send it, privately, and nowhere else.
Send the link straight away. The invitation link expires in about an hour. That is short enough to catch some people by surprise, but deliberate: it keeps an unused invitation from sitting around in someone’s inbox for weeks. If the link expires before the staff member clicks it, click the Invite button again on the staff list to generate a fresh one-hour link.
When the staff member clicks the link, they land on a password setup page with their name and username pre-filled. They enter a new password twice, and on submit Minuvox saves the password, marks their email address as verified, and signs them in. They land on the dashboard, already logged in. From that point on, they can sign out and sign back in with their username and password the same way the owner does.
Once they have set their password, the 📧 Invite button on the staff list changes to ✓ Active. That button state is how you know the invitation was used, and together with a couple of other signals on the staff list it is how you audit who has access to your account at all:
- The Login Access column shows “Yes” or “No” per row, corresponding to the Can Login flag on each staff member.
- The Login Access filter above the table switches between “All Login Access”, “Can Login”, and “Scheduling Only” – useful in a bigger team where you do not want to eyeball every row.
- The 📧 Invite / ✓ Active button in the actions column tells you whether a login-capable staff member has actually set up their account yet. “Invite” means the account exists but is dormant. “Active” means they have set their password and can sign in right now.
What Logged-In Staff Can (and Cannot) Do
Minuvox has a two-tier permission model: the owner, and everyone else with login. There are no other roles – no manager tier, no view-only tier, no per-area toggles.
Anyone with a login, owner or not, can see and manage the day-to-day running of the business: the Calendar, the Staff list, Clients, Services and Categories, Bookings, Invoices, the Audit Log, the Import tools, and the Preferences page. Any logged-in staff member can create a booking, edit a client, or issue an invoice. The product treats login as a trust signal and does not get in the way.
Only the owner can open three specific areas:
- Billing Settings – legal business name, tax IDs, invoice footer, payment instructions, and the logo that prints on every invoice. A mistake here changes how every invoice looks to your clients, so it is fenced off.
- Company Deletion – permanently deleting your entire Minuvox account. Only the person who registered the company can reach this page.
- Discounts and Promotion Codes – creating, editing, and toggling the discount system, plus generating promotional codes. Discounts directly affect what you charge, and Minuvox treats them as an owner-level concern.
If a non-owner tries to reach any of those pages, Minuvox redirects them to the Preferences page with the message “Only the company owner can access this page.” No cryptic 403, no blank page – an explanation.
What Minuvox Deliberately Does Not Do Here
A few things that might surprise you coming from larger booking platforms:
No granular permissions. Login is all-or-nothing, with the owner carve-out above. There is no “can see clients but not invoices” toggle, no read-only tier, no per-area restriction. If you need tighter control over what a specific team member can touch, the answer for now is to not give them a login and have the owner handle the work on their behalf.
No ownership transfer. The person who registered your Minuvox company is the owner, permanently. There is no form that moves ownership to a different staff member. If the original owner ever leaves the business, the only way to change ownership is to delete the company account and re-register, which starts you fresh with no existing data. Treat your registration email as the account’s permanent owner email, and make sure whoever holds it will be around long enough to matter.
No automatic invitation email. Minuvox gives you the invitation link but does not send it. Mention this when you onboard a new logged-in team member so they are not waiting for an email that will never arrive.
Invitation links are not owner-only to generate. Any staff member with login access can open the Invite button for another same-company staff member and see the link. Not a practical problem for a single-owner business with a couple of trusted team members, but something to be aware of for a larger team where you want only the owner to control invitations.
If any of those is a dealbreaker for your business, knowing now saves an afternoon of searching for a setting that does not exist.
Turning Login Off Later
When a team member leaves, you do not need to delete their staff record. Open the staff member’s edit form, untick Can Login, and save. Minuvox disconnects the staff record from the user account without deleting either one. The staff member stays in your staff list as a scheduling-only record, their past bookings, invoices, and audit history stay intact, and they just cannot sign in anymore.
Two related but different operations:
- Deactivate – untick the Active checkbox on the staff form. This hides the staff member from new booking options (the calendar will not schedule them) while keeping login and history. Use this for someone on extended leave.
- Delete – the Delete button removes the staff record entirely, along with their schedule, time-off entries, and booking line items. You cannot delete the company owner this way – Minuvox blocks that with an error message. Delete is for a staff record created by mistake or for cleaning up a test account.
For most exit scenarios, unticking Can Login is the right answer.
Where to Go From Here
Once your team has the right logins in place, Staff Scheduling for Small Service Businesses picks up with working hours, time off, and service assignments for the people you just invited. If you have not yet finished the one-time company setup, Setting Up Your Company Profile, Logo, and Business Hours covers the owner-only settings pages worth filling in before you invite anyone, and How to Set Up Online Booking for Your Salon is the broader first-day walkthrough.
If you are still deciding whether a team member needs their own login, the default answer is no. Let the owner handle their bookings, and revisit the question if it becomes a bottleneck. You can also explore the full feature set to see what a logged-in staff member would be able to do.
About the author: Adam Claassens is the founder and developer of Minuvox. He built the staff accounts, invitation, and permission system walked through in this article, which is why the steps here match how the product actually behaves. Minuvox exists to make professional booking tools accessible to small service businesses that cannot afford expensive monthly subscriptions.
This article was drafted with AI assistance and reviewed, fact-checked, and edited by the Minuvox team.