If you have been managing appointments with a paper diary, phone calls, and memory, switching to booking software can feel like a big step. It does not have to be.
This guide walks you through setting up Minuvox from scratch and shows you what daily operations look like once you are up and running. Minuvox is built for staff-side scheduling — you create and manage appointments for your clients from a calendar interface. It is free, with no trial period, no credit card, and no monthly subscription.
By the end of the setup section, you will have your services listed, your staff added, your business hours set, and your first appointment booked. The whole process takes about 20-30 minutes. After that, the second half of this guide covers what comes next: managing bookings, invoicing, tracking performance, and making the system work the way you want it to.
What You Need Before You Start
Before you open Minuvox, gather this information. Having it ready makes setup faster.
- Your business name and email address – this is how your company appears in the system and on invoices
- A list of your services – what you offer, how long each service takes, and what you charge. For example: “Women’s Cut – 45 minutes – R350” or “Full Set Acrylics – 90 minutes – R500”
- Your staff members’ names – anyone who performs services and needs to appear on the schedule. You do not need their email addresses unless you want them to log in and manage bookings themselves.
- Your working hours – what days you are open and when you start and finish
That is it. No credit card, no payment details, no contract.
Step 1: Create Your Free Account
Go to minuvox.com and click Register in the top menu.
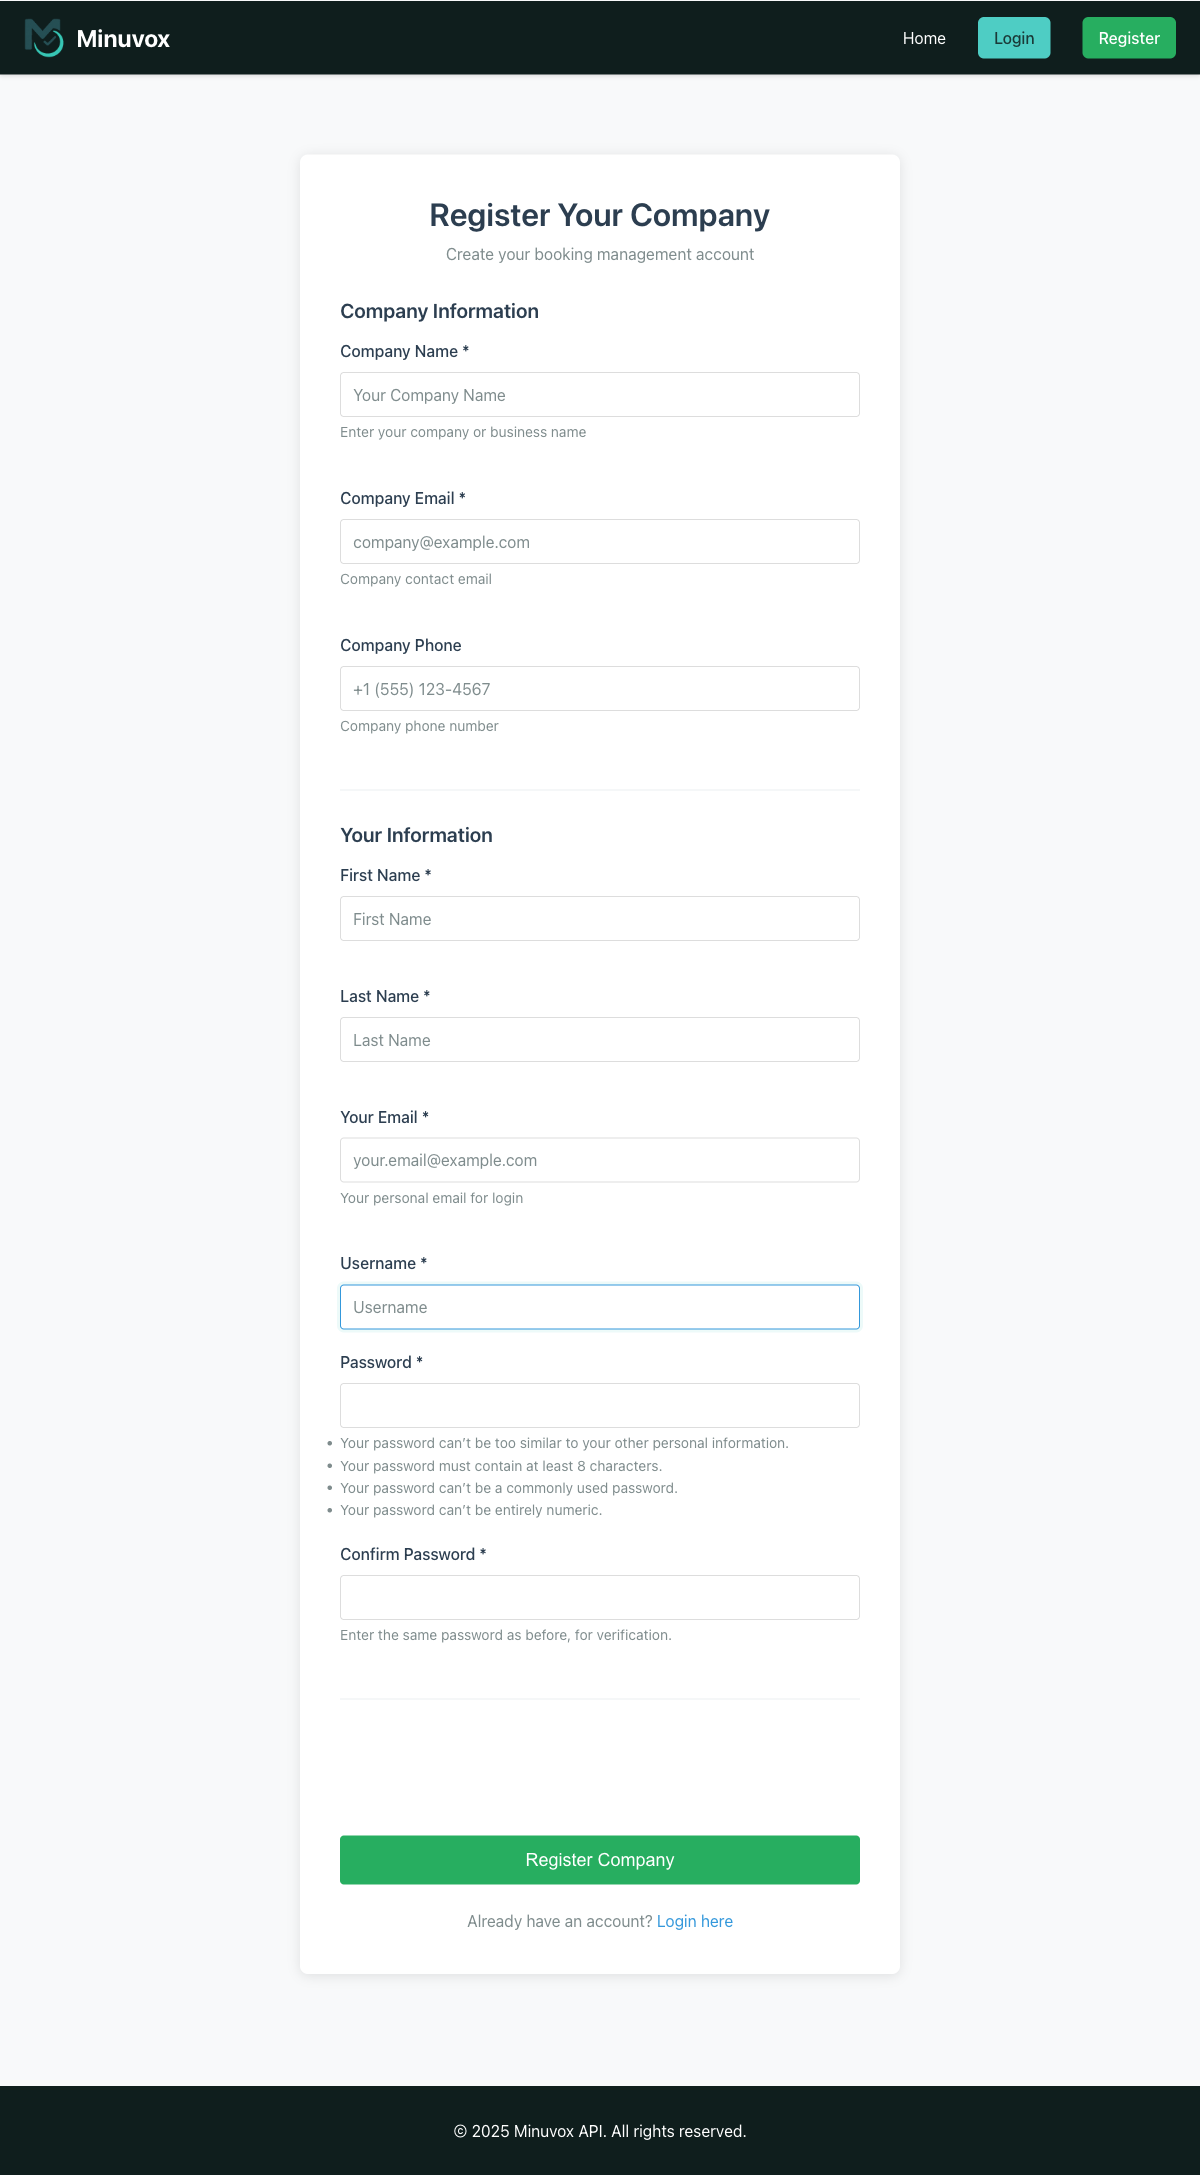
The registration form asks for:
- Company Name – your salon or business name
- Company Email – a business email address (this is separate from your personal login email)
- Company Phone – optional
- First Name and Last Name – your name as the account owner
- Your Email – the email you will use to log in
- Username – choose something you will remember
- Password and Confirm Password
Click Register Company. Minuvox will send a verification email to the address you entered. Click the link in that email to verify your account, then log in with your username and password.
Once you log in, you land on your dashboard – ready to start setting up.
Time estimate: About 2 minutes (including email verification).
Step 2: Set Up Your Services and Categories
Your services are the things clients book – haircuts, massages, facials, nail sets, whatever your salon offers. Minuvox organises services into categories, so you can group related services together.
Create a Category First
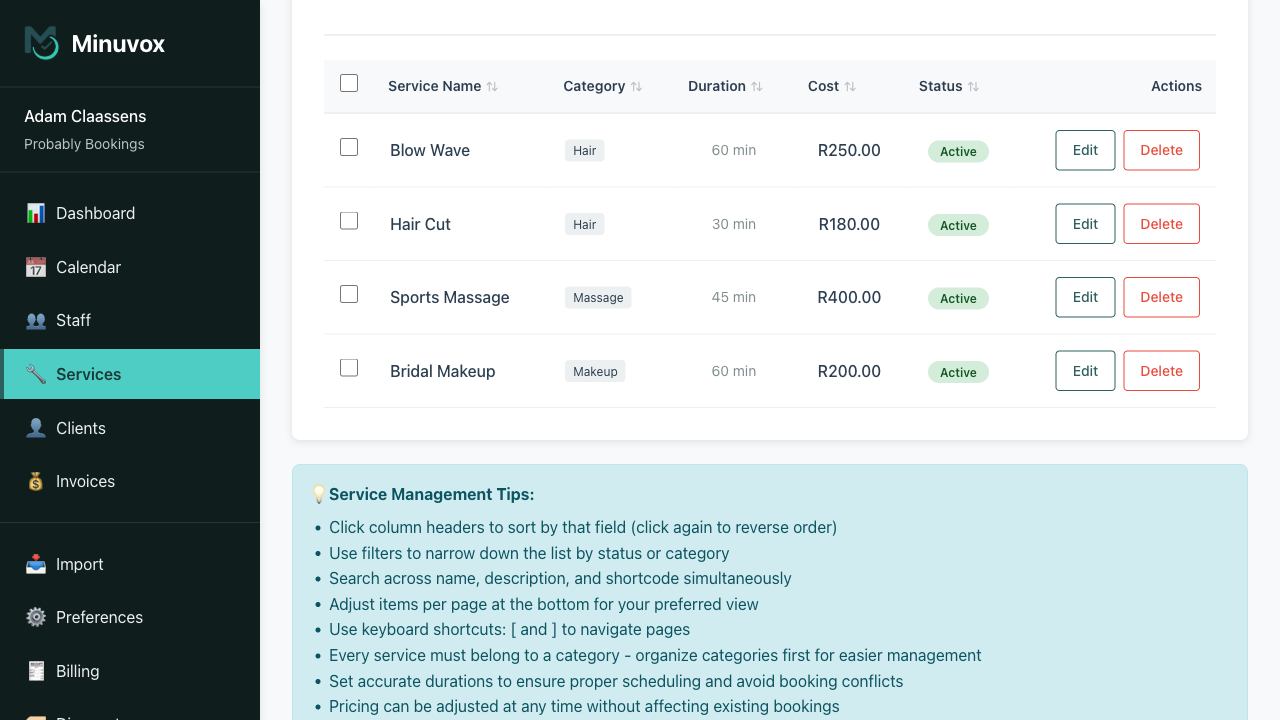
- Click Services in the left sidebar
- You will see the Services Management page. If you have no services yet, it will be empty.
- Before adding a service, you need at least one category. On the empty services page, click Create Category First
- Give the category a name that makes sense to you – “Hair,” “Nails,” “Massage,” “Facials,” whatever fits your business
Add Your Services
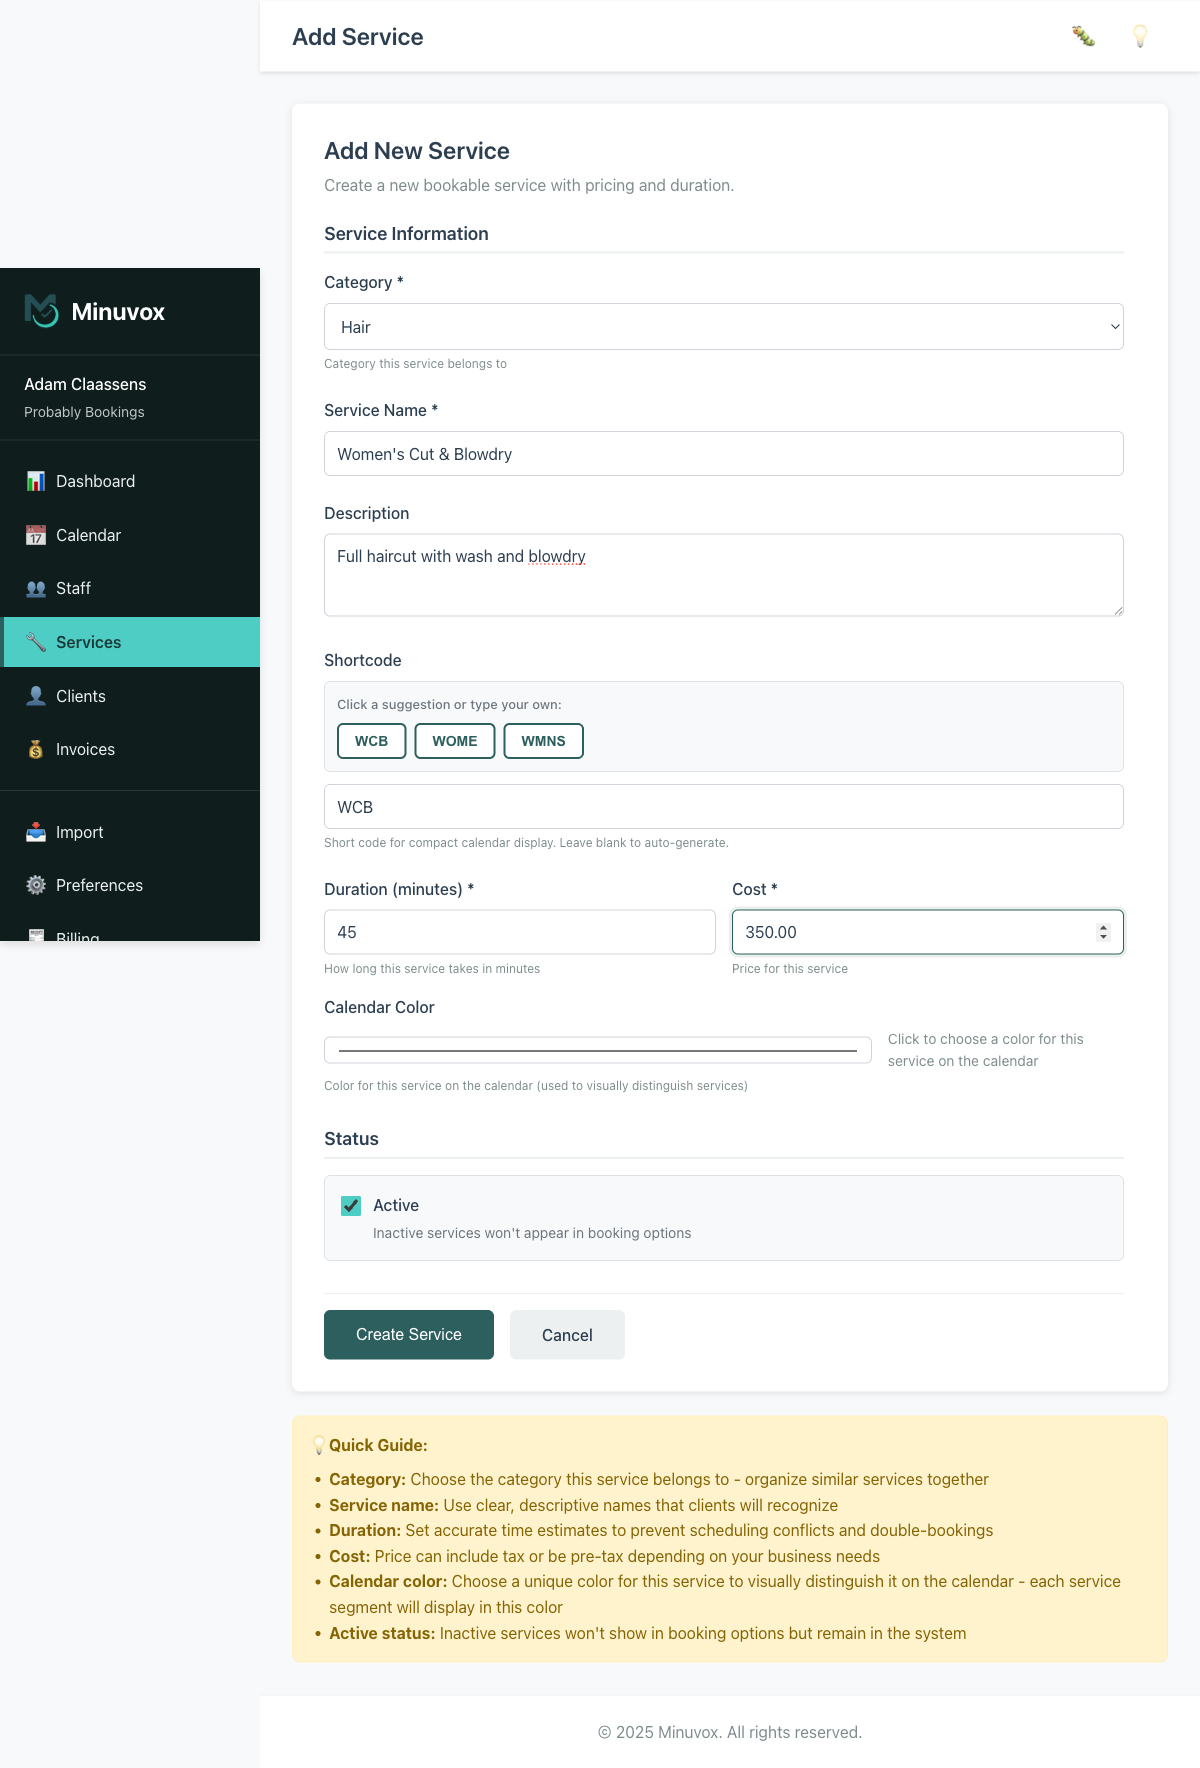
- Click + Add Service on the Services page
- Fill in:
- Category – select the category you just created
- Service Name – for example, “Women’s Cut” or “Gel Manicure”
- Description – optional, but helpful if you offer variations
- Shortcode – a short label for the calendar view. Minuvox suggests one based on the service name, so you can accept the suggestion or type your own
- Duration (minutes) – how long this service takes. Be honest about the time – if a cut takes 45 minutes including wash and blowdry, enter 45, not 30. Accurate durations prevent double-bookings.
- Cost – what you charge for this service
- Calendar Color – pick a colour so this service is visually distinct on your calendar
- Click Create Service
Repeat for each service you offer. If you have many services, you can also bulk-import them from a spreadsheet using the Import section – but for your first few, adding them one by one is faster and lets you check each entry.
Time estimate: 5-10 minutes depending on how many services you offer.
Tip: You can always add, edit, or remove services later. Do not feel pressured to list everything on day one. Start with your most popular services and add the rest as you go.
Step 3: Add Your Staff
Every person who performs services needs a staff profile so they can appear on the schedule and be assigned to bookings.
- Click Staff in the left sidebar
- Click + Add Staff Member
- Enter their first name and last name. Email and phone are optional.
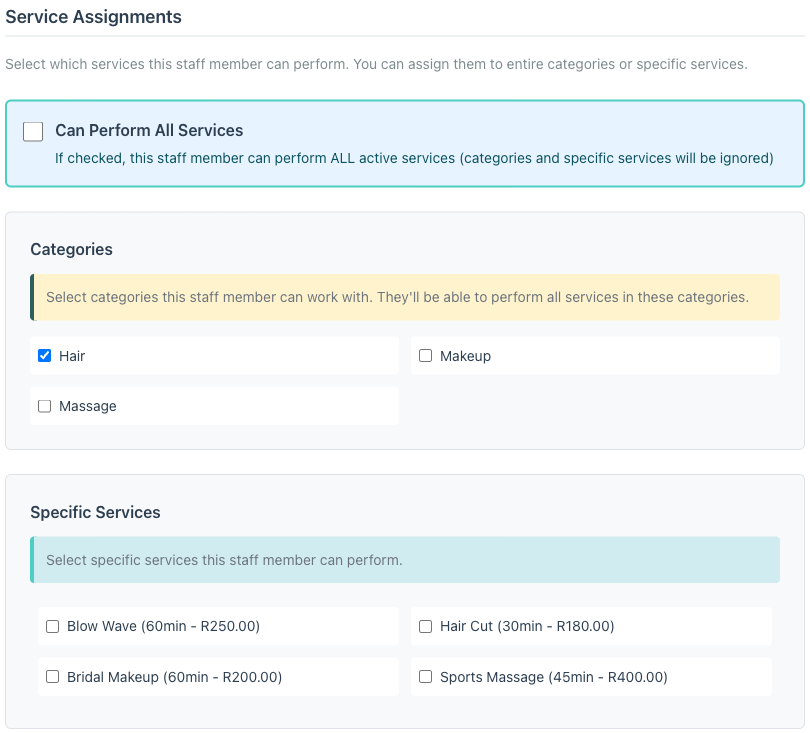
- Under Service Assignments, select which services this staff member can perform. If they do everything, tick Can Perform All Services and you are done. Otherwise, pick individual categories or specific services. A hairstylist might do cuts and colour but not massage; a nail technician does nail services but not hair. Assigning services correctly means Minuvox only shows the right staff when booking a particular service.
This step matters. A staff member with no service assignments will not appear as available when you try to create a booking. If you see “no staff available” when booking, check that the staff member has services assigned.
- Click Create Staff Member

A note on login access: Most staff do not need to log in to Minuvox. You, the salon owner, manage the schedule for everyone. Only enable “Can Login” for a staff member who needs their own login – for example, a receptionist or senior stylist who manages bookings themselves. Staff with login access can view and manage the calendar, clients, and bookings, but only the owner can access billing settings, company deletion, and the discount system.
A note on shared or temporary staff: If your business uses temporary workers, trainees, or rotating staff who share a schedule slot, you do not need to create a separate profile for every individual. Create one staff entry for the role – for example, “Trainee Stylist” – and tick Allow Double-Booking on their profile. Minuvox will then allow overlapping appointments for that entry, so you can book multiple clients into the same time slot.
When you first sign up, you (the owner) are automatically added as a staff member – but without any services assigned. Before you can book your first appointment, go to Staff, click your own name, and assign your services (or tick Can Perform All Services).
Time estimate: 2-5 minutes for a small team.
Step 4: Set Your Business Hours
Tell Minuvox when your salon is open so the calendar shows the right time slots.
- Click Preferences in the left sidebar
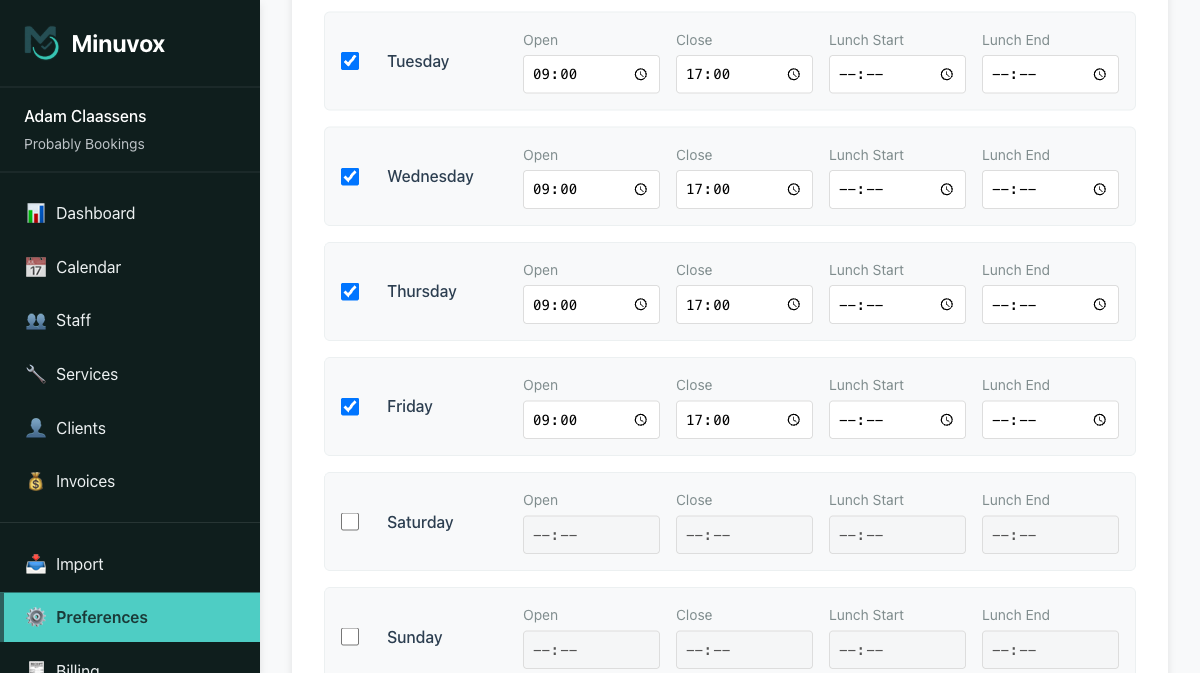
- Scroll down to the Weekly Business Hours section. For each day:
- Tick the checkbox next to the day name to mark it as a working day
- Set the Open and Close times
- Optionally set lunch break times
- Leave days unticked that you are closed
- While you are here, check that your Timezone is correct under Regional Settings near the top of the page
- Click Save Preferences
The calendar will now show time slots only during your working hours. If you are open Monday to Saturday, 8am to 6pm, the calendar will show 15-minute slots across that range and hide Sundays.
Time estimate: 1-2 minutes.
Step 5: Book Your First Appointment
You have services, staff, and business hours. Time to create a booking.
- Click Calendar in the left sidebar
- You will see your day view with empty time slots. Each slot shows a + Book button.
- Pick a time slot and click + Book
- Select the client (you can add a new client on the spot if needed), the service, and the staff member performing it
- Confirm the booking
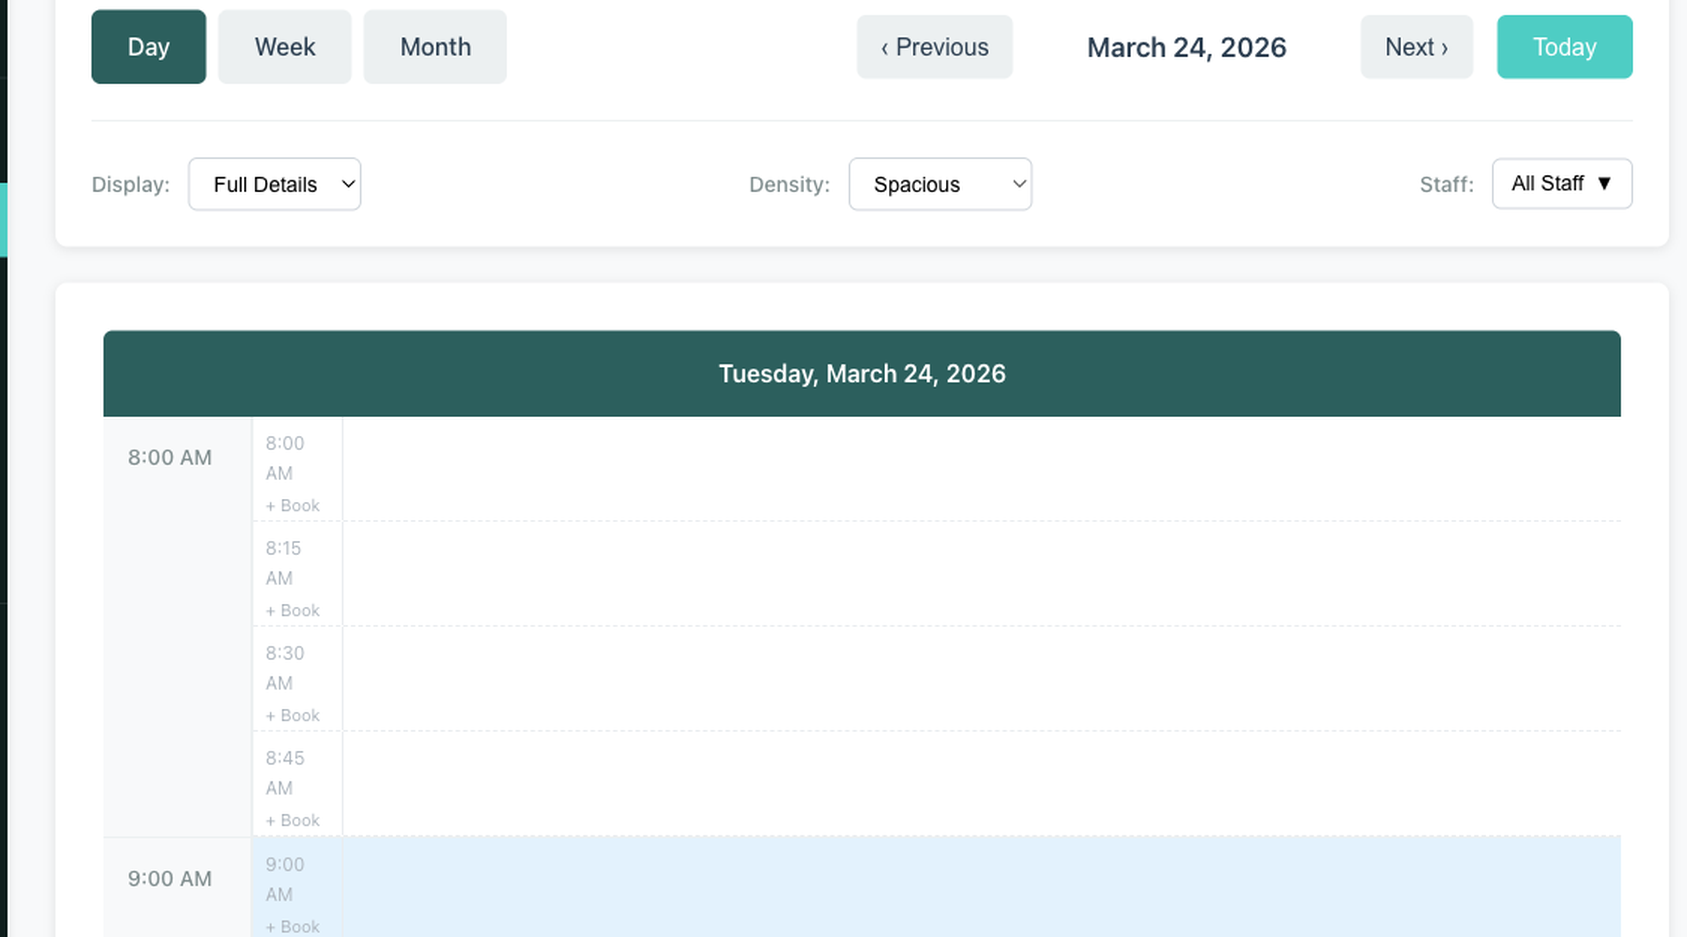
The appointment now appears on your calendar, colour-coded by service. You can switch between Day, Week, and Month views to see your schedule from different angles.
If you have multiple staff, use the Staff filter at the top to view one person’s schedule at a time or see everyone side by side.
Time estimate: Under 1 minute per booking.
Running Your Business Day to Day
Setup is done. Here is what daily operations look like in Minuvox.
Managing Bookings After They Are Created
Every booking moves through a status: Scheduled, Confirmed, Arrived, In Progress, Completed, Cancelled, or No Show. You update the status from the booking detail page as the appointment progresses.
You can also mark a booking’s payment status as Pending, Paid, or Refunded, and record the payment method – cash, card, bank transfer, or mobile payment. This keeps your revenue tracking accurate without needing a separate payment system.
If a client does not show up, mark the booking as No Show. Minuvox tracks your no-show rate on the dashboard so you can spot patterns over time.
Invoicing and Payments
Minuvox includes a full invoicing system. Invoices start as Drafts, giving you a chance to review and edit line items, dates, tax rate, and notes before you send anything to a client.
When the invoice is ready, mark it as Issued. After the client pays, change it to Paid. If something goes wrong, you can Void an issued invoice and create a corrective draft in one step.
To set up your invoices, go to Billing in the sidebar and add your business name, tax ID, address, and logo. These details appear automatically on every invoice you create. Clients also have optional billing fields – company name, tax ID, and billing address – that populate the “Bill To” section of each invoice.
If you offer discounts or promotional codes, the owner can create those under Discounts in the sidebar and apply them to draft invoices.
Tracking Your Business Performance
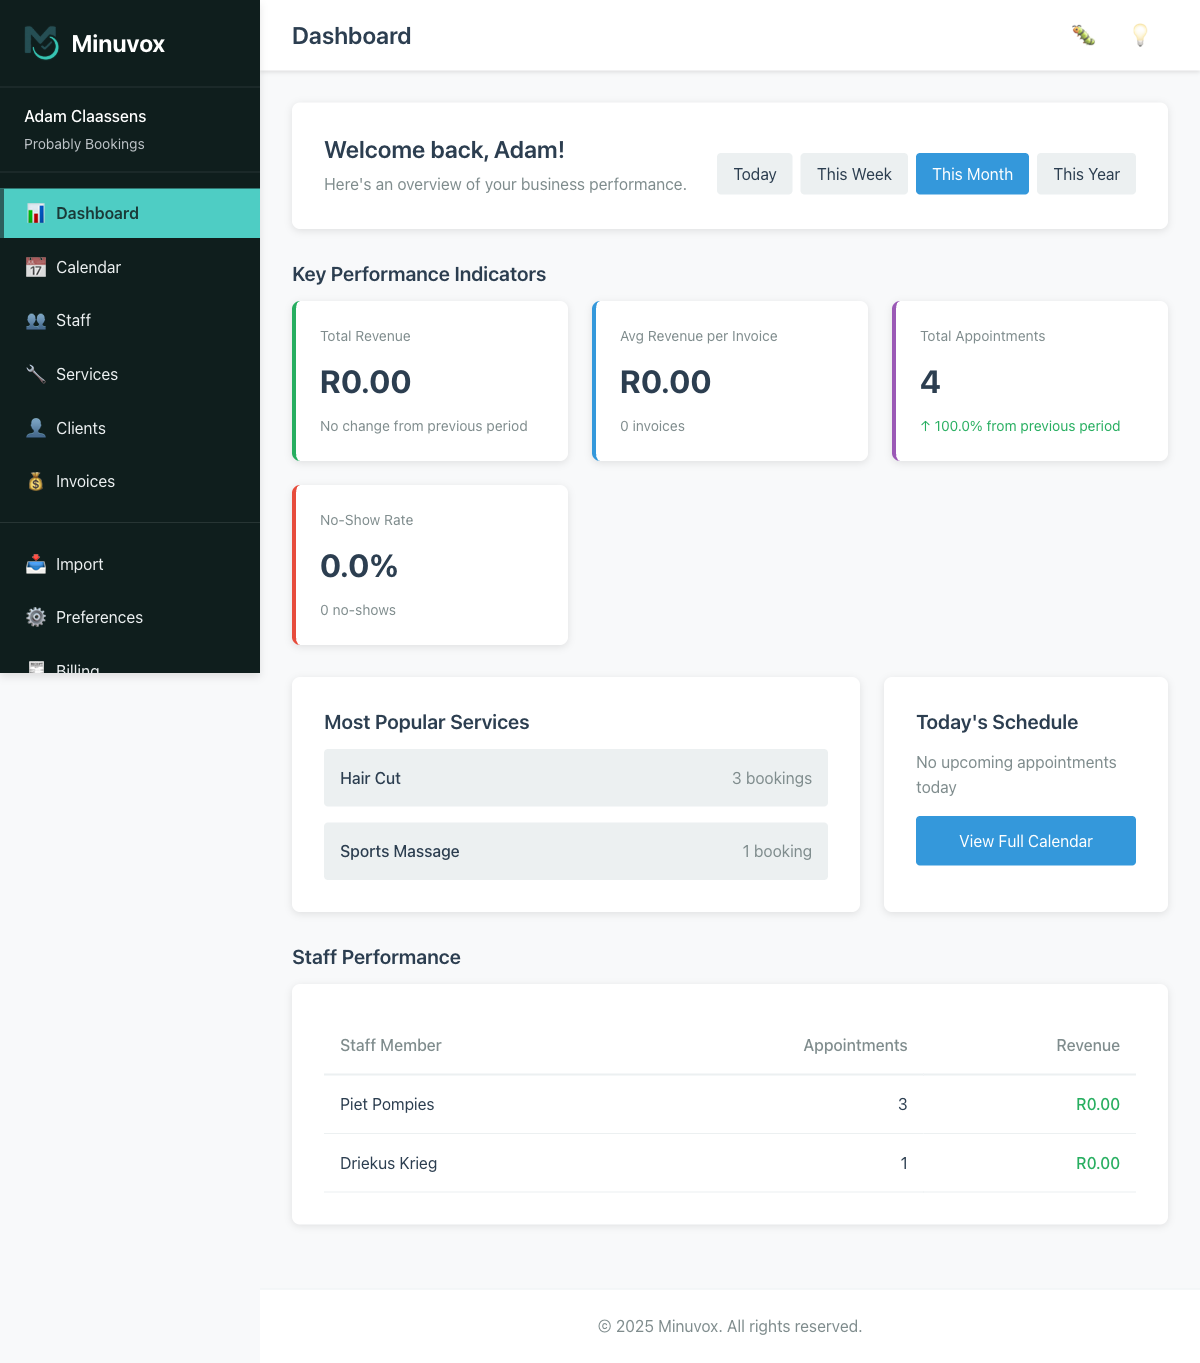
The Dashboard is the first thing you see when you log in. It shows key numbers at a glance:
- Revenue and average revenue per invoice for the selected period
- Total appointments and no-show rate
- Most popular services – which services get booked most
- Staff performance – appointments and revenue per staff member
- Today’s schedule – a quick view of what is happening right now
As you accumulate bookings and invoices, these numbers become more useful. You can change the time period to view today, this week, this month, or this year.
Audit Logs
Under Audit Logs in the sidebar, Minuvox keeps a record of significant actions across your account – bookings created or changed, invoices issued, staff added, clients updated, and more. Each entry shows who performed the action, when, and what changed.
This is useful if you have multiple staff with login access and want to see who made a particular change, or if you need to trace the history of a booking or invoice.
Your Calendar Preferences
Minuvox remembers your personal display preferences on the calendar. You can choose your preferred view (Day, Week, or Month), display density (Compact, Comfortable, or Spacious), and how much detail appears on each appointment card. These settings are per-user, so if you have staff who log in, each person sees the calendar the way they prefer.
What Minuvox Does Not Do Yet
Minuvox handles staff-side booking management. You create and manage appointments for your clients from the dashboard. There are a few things the platform does not offer today:
- Client self-booking: There is no public-facing booking page where clients book their own appointments. All bookings are created by you or your staff.
- Automated reminders: Minuvox does not send SMS or email reminders to clients before their appointments.
If either of these would make a difference for your business, use the Bug Report or Feature Request forms in the sidebar to tell us. Every submission goes directly to the development team, and user feedback drives what gets built next.
For a full list of what Minuvox includes today, see the features overview. For a visual walkthrough of the setup process, How It Works covers the same steps with screenshots.
Ready to Get Started?
Sign up free at minuvox.com – it takes about 30 seconds. If you have clients or services in a spreadsheet, the Import section handles CSV uploads for categories, services, clients, and staff so you do not have to re-enter everything manually.
About the author: Adam Claassens is the founder and developer of Minuvox. He built the platform to make professional booking tools accessible to small service businesses that cannot afford expensive monthly subscriptions.
This article was drafted with AI assistance and reviewed, fact-checked, and edited by the Minuvox team.