Handing a client a handwritten receipt on a scrap of paper does not look professional. Neither does chasing payments weeks later because you forgot to record what was owed.
Minuvox includes a full invoicing system that handles the entire flow: create a draft from a booking, review and adjust it, issue it to the client, and record payment when it comes in. If something goes wrong, you can void an invoice and create a corrected one without losing the audit trail.
This guide walks you through setting up your billing details, creating your first invoice, and managing the lifecycle from draft to paid. If you have not set up your Minuvox account yet, start with How to Set Up Online Booking for Your Salon.
How Invoicing Works in Minuvox
Every invoice moves through four statuses:
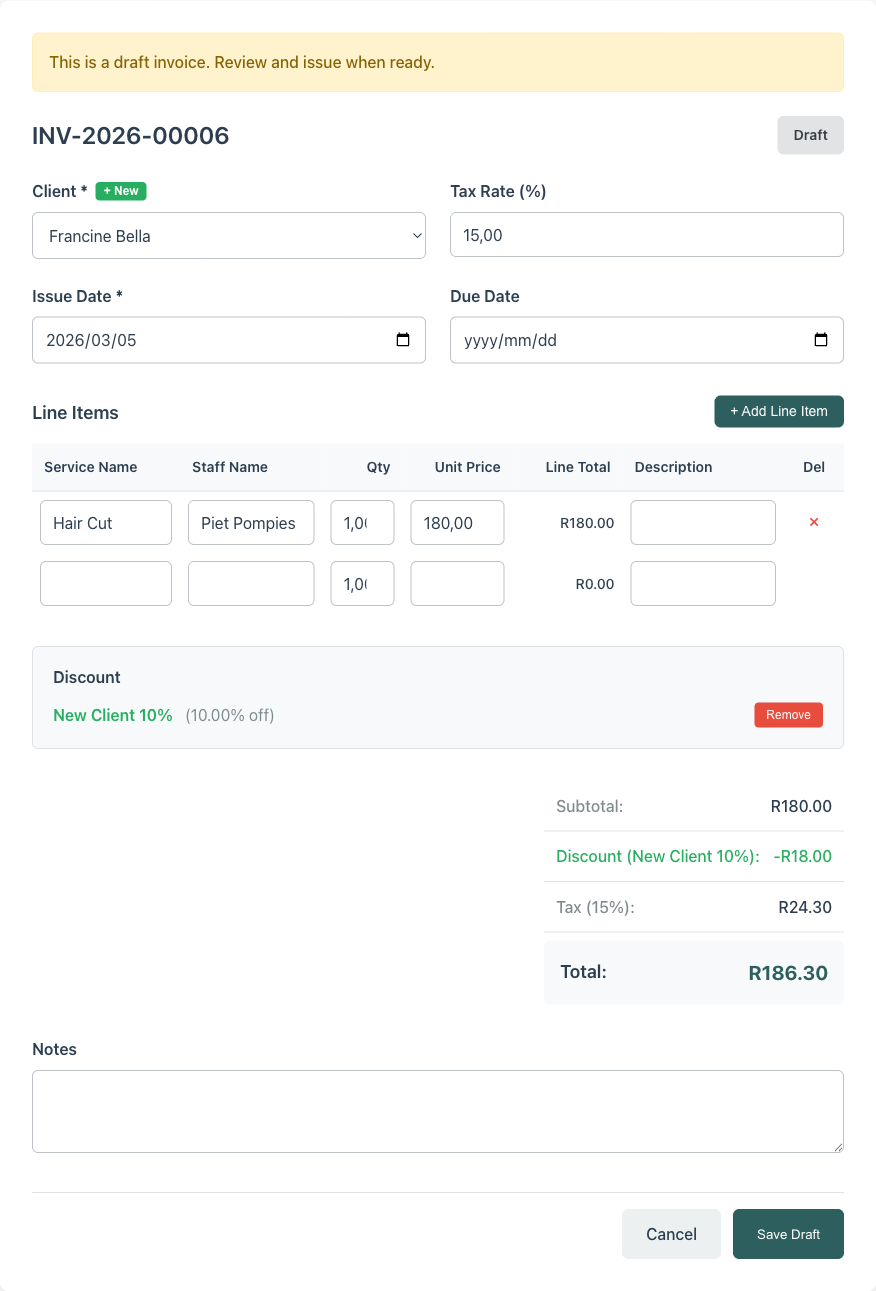
- Draft – the invoice exists but has not been sent to the client. You can edit everything: line items, dates, notes, tax rate.
- Issued – the invoice is finalised and ready for the client. You can no longer edit it (if you need to change something, void it first).
- Paid – payment has been received and recorded.
- Void – the invoice has been cancelled. Voided invoices stay in your records for the audit trail but no longer count toward revenue.
Invoices are created from bookings. The normal case is invoicing after a booking is completed, but you can also create an invoice for any non-cancelled booking – useful if you need to collect prepayment before the appointment. When you create an invoice from a booking, Minuvox pulls in the service names, staff names, quantities, and prices automatically. You review the draft, make any adjustments, and issue it.
One thing worth knowing: invoices snapshot your billing details and the client’s details at the time they are created. If you later change your business address or a client’s name, existing invoices are not affected. This is intentional – an invoice should always reflect what was true when it was issued.
Step 1: Set Up Your Billing Details
Before you create your first invoice, configure the information that appears on every invoice you send.
- Click Billing in the left sidebar (owner-only)
- Fill in:
- Legal Name – your registered business name
- Trading Name – your trading-as name, if different
- Tax IDs – up to two tax identifier fields with custom labels (for example, “VAT Number” and “Company Reg”). The label and value you enter here appear on every invoice.
- Address – your business address (line 1, line 2, city, state/province, postal code, country)
- Company Logo – upload your logo. It appears at the top of every invoice.
- Invoice Footer – text that appears at the bottom of each invoice (for example, banking details or terms of payment)
- Payment Instructions – specific payment instructions for clients
- Click Save
These details are copied onto each invoice when it is created. If you update them later, new invoices will use the updated details, but existing invoices keep the original values.
Tip: Get your billing details right before you issue your first invoice. While you can always update them for future invoices, issued invoices cannot be changed – only voided and re-created.
Step 2: Create an Invoice from a Booking
You create an invoice from the booking detail page. Most of the time you will do this after a booking is completed, but Minuvox allows invoicing for any non-cancelled booking if you need to bill in advance.
- Open the booking you want to invoice (from the Calendar or the booking detail page)
- Click Create Invoice (if the booking is not yet completed, Minuvox shows a prepayment notice before creating the draft)
- Minuvox generates a draft invoice with:
- A sequential invoice number (e.g. INV-2026-00001)
- Line items pulled from the booking (service name, staff member, quantity, unit price)
- Your billing details and the client’s details (name, company, tax ID, address if available)
- Today’s date as the issue date
- Your company’s tax rate applied automatically
- You land on the invoice edit page to review the draft before issuing
Each booking can only have one invoice. If an invoice already exists for a booking, Minuvox tells you and links to it instead of creating a duplicate.
Step 3: Review and Issue the Invoice
The invoice edit page is where you fine-tune the draft before sending it.
What You Can Edit on a Draft
- Line items – change service names, quantities, or unit prices. Click + Add Line Item to add extra charges (a product sale, a late cancellation fee, anything you need to bill for). Remove items you do not want on the invoice.
- Issue date and due date – adjust if the defaults are not right
- Tax rate – pre-filled from your billing settings, but you can override it per invoice
- Notes – internal notes (not visible to the client on the invoice)
- External invoice number – if you also use an external POS system, record the receipt number here for cross-referencing
- Click Save Draft to save without issuing
Issuing the Invoice
When the draft looks right:
- Open the invoice detail page (click the invoice number from the list or save the draft first)
- Click Issue Invoice
- Confirm in the modal
Once issued, the invoice is locked. The status changes to Issued and the action buttons change: you now see Mark as Paid, Void & Correct, and Void Invoice.
Step 4: Record Payment
When the client pays:
- Open the invoice
- Click Mark as Paid
- In the modal, enter the payment date and an optional external reference (cheque number, transaction ID, etc.)
- Confirm
The invoice status changes to Paid. The payment shows up in your dashboard revenue tracking for the period it was recorded in.
Handling Corrections and Voids
Mistakes happen. A price was wrong, a line item was missed, or the client disputes a charge. Minuvox handles corrections without deleting anything – because deleting financial records is bad accounting practice.
Voiding an Invoice
If an issued invoice needs to be cancelled entirely:
- Open the invoice
- Click Void Invoice
- Enter an optional reason
- Confirm
The invoice status changes to Void. It stays in your records with the reason attached, but it no longer counts toward revenue.
Void and Correct
If an issued invoice needs a change (not a full cancellation):
- Open the invoice
- Click Void & Correct
- Enter an optional reason for the correction
- Confirm
Minuvox voids the original invoice and creates a new draft with the same line items. You edit the new draft to make your corrections, then issue it as a replacement. Both invoices – the voided original and the corrected replacement – remain in your records.
When to void vs when to void-and-correct: Use Void when the invoice should not exist at all (wrong client, duplicate, cancelled appointment). Use Void & Correct when the invoice was right in principle but had an error in the details (wrong price, missing line item, incorrect tax rate).
Using Discounts and Promotion Codes
If you want to offer discounts to clients, the owner can set them up under Discounts in the sidebar.
Minuvox supports two types of discount:
- Percentage – for example, 10% off. You can set a maximum discount amount to cap it (so 10% off a R5,000 invoice does not exceed R200, for example).
- Fixed amount – a flat amount off the invoice total (for example, R50 off).
Each discount can have: - A minimum spend threshold (only applies if the invoice subtotal reaches a certain amount) - A validity period (start and end dates) - A usage limit (maximum number of times it can be used)
You can also create Promotion Codes linked to a discount – a shareable code that applies the discount when entered.
Discounts are applied to draft invoices before tax is calculated. This means the tax applies to the discounted amount, not the original subtotal.
Discounts and promotion codes are owner-only features. Staff with login access cannot create or manage them.
The Invoice List
Click Invoices in the sidebar to see all your invoices. The list shows invoice number, client, issue date, due date, amount, and status.
You can filter by status (Draft, Issued, Paid, Void), filter by date range, search by invoice number or client name, sort by any column, and export the current view to CSV.
This is also where you spot overdue invoices. If an invoice has a due date in the past and is still in Issued status, it needs a follow-up.
About the author: Adam Claassens is the founder and developer of Minuvox. He built the platform to make professional booking tools accessible to small service businesses that cannot afford expensive monthly subscriptions.
This article was drafted with AI assistance and reviewed, fact-checked, and edited by the Minuvox team.